
Build a robot that can play ConnectFour
Hello you,
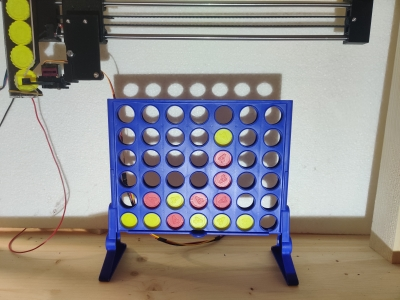
in the last couple of months some fellow students and I build a robot that can play ConnectFour.
Of course the software is available on GitHub.
Made with love by: Vincent Gierisch, Erik Smekal, Florian Ott, Simon Gottschalk, Andreas Nerl
Quick Overview (Main Features)
- Obviously it can play connect four very well.
- It can detect if a human wants to touch the robot, while it is moving.
- It can play sound samples during specific game situations.
- The human can define the difficulty as well as which player should open the game.
Not so quick Overview
- Roboter uses an Arduino for the control of the hardware and a raspberry pi for calculating the best moves and playback of the sound samples.
- To calculate the best move we make use of the Min-Max-Algorithm.
- To get the column in which the human made his move, we use a camera that is connected to the raspberry pi as well as OpenCV to extract information from the picture that was taken. We also use OpenCV to detect a human-robot interaction that will abort the game immediately.
- For the communication between all these tiny programs we use NodeJS. NodeJS is also responsible for the audio stuff.
Overview of the interesting parts
Construction
The construction of the robot almost consists of wood (the frame) and printed parts (the rest). A robot claw can take a disc out of the dispenser and drop it in a column of the board. In order to achieve this we have a carriage that can move on two linear shafts via a timing belt and stepper motor. On this carriage we mounted a claw that can open and close with the help of a servo. Following is a list of all the parts needed to build the construction:
- I have uploaded all files I used to thingiverse, so you have all of them in one place.
- Please also give some credits to the origins of the parts. I’ve listed them in the parts description
- Robotic claw. You just need the claw from this whole robotic arm.
Hardware parts
To move the carriage we use a Nema 17 Stepper motor and a GT2 6mm timing belt and drive it with the L298N Bridge. The carriage moves on two 450mm * 8mm linear shafts and 4 8mm linear bearings. To detect the home position of the carriage we use a Winmo Microswitch. For the open/close movement of the claw a MG90S Servo is used. Here is a list of all the parts available at a random marketplace webseite:
For the move calculation as well as the image analysis we use a raspberry pi 4 with 4 Gb RAM. To control the electronic parts we use an Arduino Uno. They are connected via USB.
Network
In this chapter I would like to give an overall view of the individual software components as well as how they communicate. Our requirement is that we have different services in use that function independently to each other. This has the advantage that we can exchange individual services if necessary. The following services are active on the Raspberry Pi:
- Image-Analysis Service
- In this service, the board is evaluated via a camera image
- Move-Calculation Service
- The service calculates the best possible move taking a difficulty level into account.
- Broker
- This service handles the communication between the image analysis service, the move calculation and the Arduino. It also manages the game, which means that after each move it checks whether the game is finished and informs the services if necessary.
The services mentioned above communicate via TCP/IP with each other. In addition, the broker and the Arduino communicate via the USB protocol. Our network messages consist of three parts each:
| Type (8-Bit) | Length of Payload n (8-Bit) | Payload (n-Bytes) |
|---|---|---|
The type of a message is unique within a communication channel (e.g. broker <-> move calculation). It indicates what type of payload it is. The length of the message indicates how many bytes the actual message consists of. So the actual message can consist between 0 and 256 bytes. The full length is not used in our project, but we kept it open to send larger messages.
Broker
The broker is written in NodeJS and Typescript. The main features are:
- Handling the communication between the services.
- Managing the game.
- Evaluating the data that comes from the IA Service.
- Playing sound files in some situations.
The code is quite strait-forward and pretty easy to understand, so just go-ahead and take a look.
A rather interesting part of the broker is the VgrParser. It parses the serial data and fires the “onData”-Event if the whole message is available. This was necessary because under normal circumstances the “onData”-Event is fired if any data is available.
Move Calculation
The Move Calculation is written in C++ and uses the Min-Max-Algorithm and an own heuristic. The code is also quite strait-forward. Please check it out.
Image Analysis
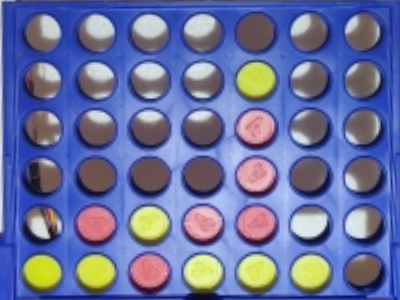
The Image Analysis Service is written in python3. It uses OpenCV for the analysis part. If there is a capture request, the service will take a picture with the camera that is attached to the raspberry pi. The picture will then be scaled down for performance reasons. There will also be a transformation from rgb to hsv.
- Picture taken from the camera
- After hsv transformation
To find the board a color masking with the blue color of the board is applied. Next we will get the contours of the board using an OpenCV function. We just use the contour with the biggest area. This will make sure that little blue artefacts will not be in the final projection.
Now a hue transformation is made. That means that we get all lines from the detected contours.
- Hough transformation
Now all intersection points of all lines are calculated. Note that these points must be within the picture. Also the intersected lines must have a minimum angle. This makes sure that intersection points will be found just from lines that are “almost” perpendicular.
With these intersection points we will calculate the average point. With the help of this point we can group the intersection points in four categories: Top-left, Top-right, Bottom-left and Bottom-right.
Now we can calculate the averages of each category and we have the four corners of the board. With these four corners we can make an image projection, to just have the actual board in the image.
- Board Projection
To detect the tokens, we again apply a red and a yellow color mask to the board projection. And, again, search for the contours (and define that the contours have to be in the form of a circle). As we now know the coordinates of these circles we can compute an array to send back to the broker.
That was all the cool stuff I wanted to write about.
Stay safe and keep hacking!